Drip joints leaking: find the joint, then the ₹6 fix
Drip joints leaking are nearly always the take-up at the sub-main, then a joiner, then an end cap. How to find which, why each fails, and what to repair.
28 October 2026 · 4 min read · REDYPLAST
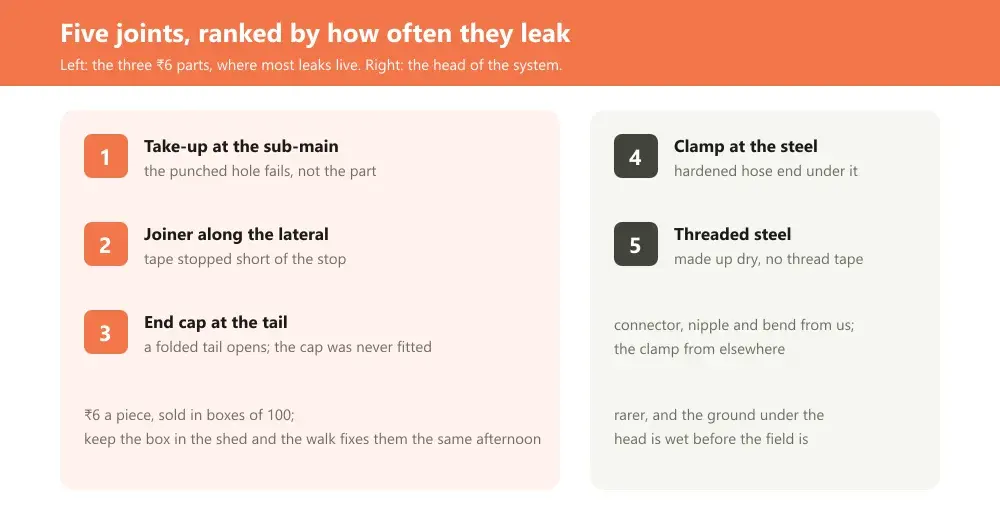
Drip joints leaking are, in order of how often it turns out to be the one, the take-up where a lateral leaves the sub-main, a joiner somewhere along a lateral, an end cap at a tail, the clamp where the lapeta meets the steel at the pump, and last of all a threaded steel joint. The first three are ₹6 parts, so for most drip joints leaking the repair costs less than the walk to find it.
This guide gives the walk, the reason each joint fails, the fix for each, and the point at which patching stops being worth it and a length of pipe should be replaced instead.
Drip joints leaking: find which one first
Open the valve to one block with the pump running and walk it from the head to the tails, looking for water where no dripper is. A jet is obvious; a weep shows as a dark patch wider than the dripper band, or as a stretch of mud under the sub-main. Walk the sub-main first, because one leaking take-up out of sixty is easy to miss among sixty wet spots where the laterals start.
Then read the far-end dripper. Pressure that is normal by the valve and weak at the tail, with a wet patch between, is a leak on that lateral; pressure weak at the valve too is a supply problem, and the pressure-drop guide sorts that case. A leak found on the walk fixes the pressure as well, which is why the walk comes before any new part.
- Sub-main: look at the belly of the pipe under each take-up, and at every join and the end.
- Laterals: a jet along the row is a tear or a split; a weep at a lump is a joiner.
- Tails: a tail that has slipped its cap runs, not weeps, and the row end is a puddle.
- Head: a clamp or a thread weeps in a ring; the ground under it is wet before the field is.
The take-up: hole size is the whole story
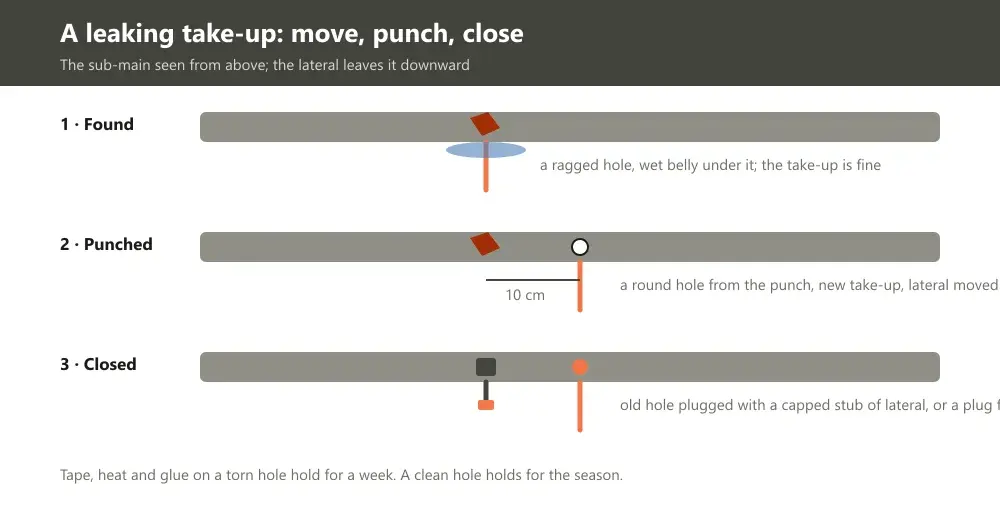
The take-up is a barbed start connector pushed into a hole punched in the sub-main, and it leaks when the hole is wrong. Too big, from a worn punch or a twist as it went in, and the barb cannot seal; ragged, from a hole cut with a knife rather than punched, and the sub-main tears a little more at each pull on the lateral. The take-up itself almost never fails; the hole does.
Do not try to seal a bad hole with tape or heat. Move 10 cm along the sub-main, punch a fresh round hole with the punch the take-up size calls for, and fit a new take-up; close the old hole with a short stub of lateral capped at both ends pushed into it, or with a plug from elsewhere, because we do not stock a plug.
Keep the laterals from pulling on the take-ups: a line dragged by a picker's basket levers the barb in the hole, and the leak appears a week later. The take-up is ₹6 and sold by the hundred.
The joiner: pushed to the stop, or not at all
A joiner leaks for one reason: the lateral was not pushed past the barb to the stop. A cold, stiff tape in a January morning, a cut made at an angle, or a hurried fit in April all leave the end sitting on the first barb, where it holds pressure for a week and then weeps. On the thin 0.2 mm tape a second failure shows up: the tape splits at the barb if it was forced on dry.
The fix is to cut both ends square, warm a stiff tape for a minute in the sun or in the hand, push each end on with a twist until it stops, and look for the tape sitting flat on the shoulder of the joiner.
A tape that splits at every joiner has gone brittle in the sun and is past joining; the pipe-life guide says why, and the lateral is replaced. The joiner is ₹6, and the box of 100 at ₹600 is the shed's repair stock for years.
The end cap and the tail
A tail that must be opened for flushing is still capped between flushes. Fold, sleeve the fold with a 5 cm cut of the same lateral, and cap over the sleeve; that holds through a season of opening and closing.
A tail leaks because it was folded once and tucked, and the fold opened under the first hot afternoon's pressure. The end cap is the cure, at ₹6 a tail, but it is also the fitting most often left off because the tail is under the canopy and nobody sees it run. Walk the row ends at the start of every season; a tail running for an hour a day wastes more than a dozen weeping joiners.
The head: clamps and threads
Between the pump and the sub-main the joints are different in kind. The lapeta or HDPE main meets the steel on a connector, the 2 inch at ₹558 and the 3 inch at ₹1,053, held by a clamp; a leak there is a clamp that has lost its bite or a hose end that has hardened and cracked under it. Cut 10 cm off the hose and re-clamp on fresh pipe before buying anything.
Threaded steel weeps in a ring when the thread was made up dry; take it apart, wrap thread tape, and make it up again. A cracked socket or bend is replaced, not wrapped. The pump-to-lateral guide walks the head joint by joint, and the clamps themselves are not something we stock.
Repair, or replace the length
The three small fittings are sold by the hundred, and the box-rate guide explains why a ₹6 part shows a ₹600 number. Count what the field needs and keep the rest of the box in the shed. If the leaks are at every take-up on a new block, the hole size or the punch is wrong rather than the parts; send us the sub-main size and a photo of a take-up in its hole before re-punching the lot, and we will say which punch the fitting wants.
- Repair: a torn take-up hole, a joiner short of the stop, a missing cap, a clamp on hardened hose. Fittings from the [drip range](/category/drip-irrigation), minutes each.
- Replace the lateral: a tape that splits at every joiner, or a lateral chewed or cut in several places.
- Replace the sub-main length: a sub-main with torn holes every few take-ups, usually one that was punched with a knife; re-punching sixty holes costs more than the pipe.
- Rethink the layout: a block whose laterals are pulled at every picking needs the sub-main moved to the headland, not another box of take-ups.
Keep reading
Drip pressure dropping mid-season: fixes ranked by likelihood
Drip pressure dropping mid-season is a leak, a supply problem or a filter, rarely the emitters. The cup test, the causes in order, and what to repair.
GuidesFixing joints leaking in a rain pipe system
Joints leaking in a rain pipe system happen at three places on the pipe - the head, any mid-line join, and the tail. The field test and honest fix for each.
GuidesDrip emitter spacing for chilli on red loam, and the run time
Drip emitter spacing for chilli on red loam matters, because the wet bulbs barely meet. Where the plants go, the minutes per day, and two schedules that fail.